


Ever wonder why sending print-ready files is so complicated? You’re not alone.
Struggling with print-ready files is a common theme in marketing departments these days.
Why?
Print marketing has made a massive resurgence after taking a backseat to digital-first marketing strategies.
But somehow, in the transition period when digital entered the marketing spotlight, important intermediaries faded from the picture–people whose job it was to serve as a liaison between marketing creatives and printers.
Do you have a print manager in your marketing department? Probably not. This role was slowly phased out of marketing teams over the past 15 years because they weren’t in high demand. Digital was the focus. Payroll was reallocated toward social media managers, SEO gurus and PPC specialists.
Now, with a return to print media, the demand is high, but print managers are long gone.
This can wreak havoc on marketing teams since failing to provide proper print-ready files can result in delays, errors and low-quality print materials.
Fortunately, there are standards for print-ready files, and once you understand these universal specifications, you’ll quickly go from beginner to a prodigy of print!
Your training begins now and will cover:
- Why print ready-files are necessary.
- Understanding print specifications.
- Page setup: bleed area and crop lines.
- Color management: CMYK vs. RGB vs. PANTONE.
- Artwork guidelines: resolution, raster images and vector images.

Why Print-Ready Files are Necessary
Office printers and commercial printers are designed for different purposes.
Office printers are typically designed for low to medium-volume printing, while commercial printers are designed for high-volume printing. Commercial printers use more advanced printing technologies, which can produce higher quality prints with more consistent color.
Additionally, office printers are usually set up to print basic documents, such as letters or simple graphics, while commercial printers offer more advanced settings for color calibration, image resolution and paper type. Commercial printers can also handle a wider range of paper sizes and weights, making them better suited for printing marketing materials like brochures, posters or booklets.
Think of it this way.
A document that you print at the office is like a car that you buy from a dealership and drive off without any customization. You’re happy with the car's basic features as-is, but it may not fully accommodate your specific needs and/or preferences.
A print-ready file for a printer is like a car that you customize to your exact specifications. It includes detailed instructions and precise specifications for the printer on factors, such as color accuracy, resolution and file type to ensure that the final product is exactly what you want.
Understanding Print Specifications
Print specifications refer to the technical details and requirements necessary for producing printed materials.
Typically, you’ll be working with PDF files, but these are not the run-of-the-mill PDF files you use for office printing and sharing online. The PDF files you create from Microsoft or Google software aren’t sufficient for commercial printing. Even if a mockup from your desktop printer looks fine, it won’t look right when coming from a commercial printer.
A print-ready PDF file should outline everything the printer needs to ensure the finished product meets your expectations, including imagery and text while maintaining its original formatting and layout.
Typically, commercial printers prefer print-ready files created in Adobe Creative Suite Software, including:
- Adobe Illustrator: Illustrator is a graphic design application used to create vector-based graphics (we’ll hit on vector graphics further down in the article). Common file formats include PDF, EPS, AI and SVG.
- Adobe InDesign: InDesign is the industry standard editing software for laying out long-form multipage documents, books, magazines, and brochures, as well as print and digital publications. InDesign can handle both raster images and vector graphics. Common file formats include INDD, IDML, PDF (print and interactive), EPS, HTML, JPG, PNG and XML.
- Adobe Photoshop: Photoshop is most useful for photo manipulation, pixel-based art, and web graphics. Common file formats include PSD, PDF, Large Document Format, EPS, JPG, PNG, GIF, WebP, BMP and TIFF.
Unfortunately, these files, and the programs used to create them, are not easy for a novice to learn quickly, as they all have their own specific purposes and use cases.
While you can lean on your designer to ensure your print-ready files are correct. They’re not miracle workers, though.
To avoid frustrations, here are some best practices for collaborating with your designer on print specifications.
- Pick a liaison in your marketing department to deal with your designer for consistent communication.
- Delineate from the start what is the responsibility of the designer and what your marketing staff will handle.
- Listen to your designer if they say something can’t be done or won’t look good in the end. This is part of what you hired them for and is not a place to cut corners.
- Give your designer the same style manual and checklist you use to work with your printer so everyone is on the same page for file specifications.
- Decide in advance who will communicate with the printer, whether that’s someone from your marketing department or your graphic design team. Ideally, you want someone to be a consistent point person with your printer.
- Let the printer know you’ve done your best to prepare truly print-ready files, and tell them you’re open to any feedback to make things better.
- Do a test run with an inconsequential project (e.g., something for in-house use only) to see if you’ve got all the specifications right.
- Use a specifications checklist for every single project to ensure you haven’t missed anything.
- If you are part of a multinational enterprise, make sure you include units with all measurements so you don’t confuse inches with centimeters, for example.
- If you work with multiple printers, understand that they may have slightly different demands for print-ready files. Keep a style manual in the office for each, and let any outside designers know about different requirements.
Page Setup: Bleed Area and Crop Lines
The bleed area and crop lines are both important elements in the process of preparing a design for printing.
Bleeding, in printing lingo, means running your graphics, images, or background color to the edge of the page with no white margin around the border. Bleeding gives your printed materials a more sophisticated look, but it demands a bit more attention to detail in the setup process.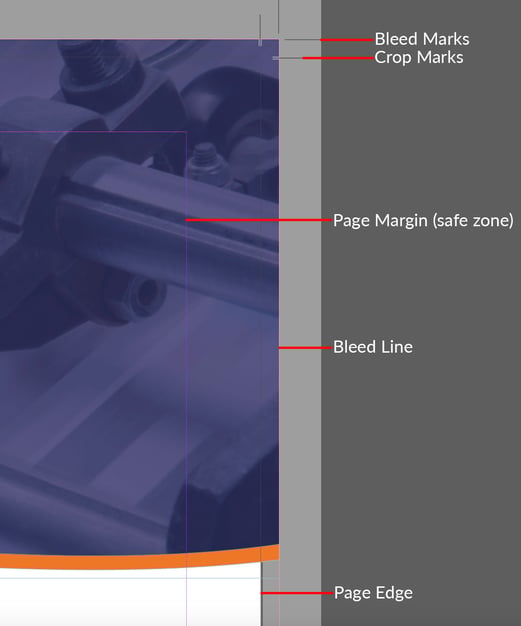
Bleed marks and bleed lines are both used to ensure that printed materials extend to the edge of the page without leaving a white border. However, they are not the same thing.
Bleed marks are small lines or marks that indicate where the design should extend beyond the final size of the printed material. These marks are typically placed at the corners of the design and help the printer know where to trim the final product. Bleed marks are usually placed outside the printable area of the design, typically 3-5 mm (0.125-0.25 inches) from the edge of the final page size.
Bleed lines, on the other hand, are lines that extend beyond the final size of the printed material and indicate the area where the design should be extended to ensure there is no white border. Bleed lines are usually set up in the design software as a margin outside the final page size, and the design elements should extend to the edge of this margin.
 Crop marks indicate exactly where the paper should be trimmed to its final size. For instance, if you want an 8.5” x 11” brochure, every page should have the crop lines set to 8.5” x 11”.
Safety zone is the zone in which you want no text or other important content to ensure it isn’t trimmed off or caught in a binding (don’t run vital content right to the edge of your document and leave a small buffer zone instead).
The page edge is the edge of a sheet after it has been cut to its final size.
Understanding Color Management: CMYK vs. RGB vs. PANTONE
This is where most marketers (and even beginner designers) run into issues. Unfortunately, this part of preparing print-ready files is critical as it directly impacts color accuracy.
Color accuracy helps to maintain consistency in branding and design across different printed materials.
Accurate colors matter.
Accurate colors help to ensure that the printed materials look professional and high-quality. If the colors are off, the materials can look cheap, low-quality or amateurish.
Worse, If you’re selling a product, you want its depiction to be as close to the real item as possible so customers get what they expect. If the colors are off, it can damage the brand's reputation and result in returns and unhappy customers.
Ready to get started and tackle color management? Let’s cover some basics first.
Color profiles, not to be confused with color space, are settings that describe how colors are displayed on a digital device, such as a computer monitor, camera or printer. They define the range of colors that the device is capable of producing, as well as how those colors are represented in a digital file.
The most commonly used color profile system is the International Color Consortium (ICC) profile. An ICC profile defines a device's color gamut, which is the range of colors that the device is capable of producing. It also includes information about how the device converts colors from one color space to another. A color space, on the other hand, is a mathematical model that defines the range of colors that can be represented in a digital file, such as RGB or CMYK.
When working with digital files inside of design programs like Adobe InDesign, Adobe Illustrator or Adobe Photoshop, it's important to make sure that you are using the correct color profile for your device and the output medium.
For example, if you are exporting a file for print, you should assign a color profile that is specifically designed for the printer and paper that you will be using. A commonly used and widely-accepted CMYK print profile is U.S. Web Coated (SWOP) v2. The majority of printers understand this color translation and will ensure that the colors in your file are accurately represented in the final printed product.
Now onto color space.
There are two main color spaces, RGB and CMYK. RGB and CMYK are like two different languages for describing color, with each language having its own set of vocabulary and grammar rules.
RGB is the language of digital displays and is the better color space for screens and digital use.
CMYK is the language of print.
CMYK, which stands for Cyan, Magenta, Yellow, and Key (black), is intended for print-based design because the color values determine how much cyan, magenta, yellow and black ink is used by the printer for each color.
It is used to describe colors that are printed on paper or other physical materials. Just as different languages have different words and grammar rules, CMYK uses a different color model than RGB.
In CMYK, colors are created by subtracting light from white paper, so the colors can appear slightly different from how they look on a computer screen. Printers use this color model because it produces the most accurate representation of color on physical media.
RGB, on the other hand, is used to describe colors that are displayed on computer screens or other digital devices. In RGB, colors are created by adding light to black pixels, so they appear brighter and more vivid on a screen. This color model is used for digital devices because it produces the most accurate representation of color on a screen.
If you send a printer your files in RGB and let the printer correct them to CMYK, the color accuracy may be off, causing you to have to go back into your files and convert them to CMYK, re-check for color accuracy, then resend the files back to the printer.
Things get even more confusing once the PANTONE color system comes into play.
If you want to produce prints with hyper-precise color representation, the best route to go is the PANTONE color system. The PANTONE color system will deliver the exact color every time, no matter who is printing or designing, whereas CMYK can result in slight color variances.
The initial process of matching your CMYK colors with PANTONE colors can sometimes be painstaking, but you only need to define them once with your printer.
Artwork Guidelines: Resolution, Raster Images and Vector Images
Resolution
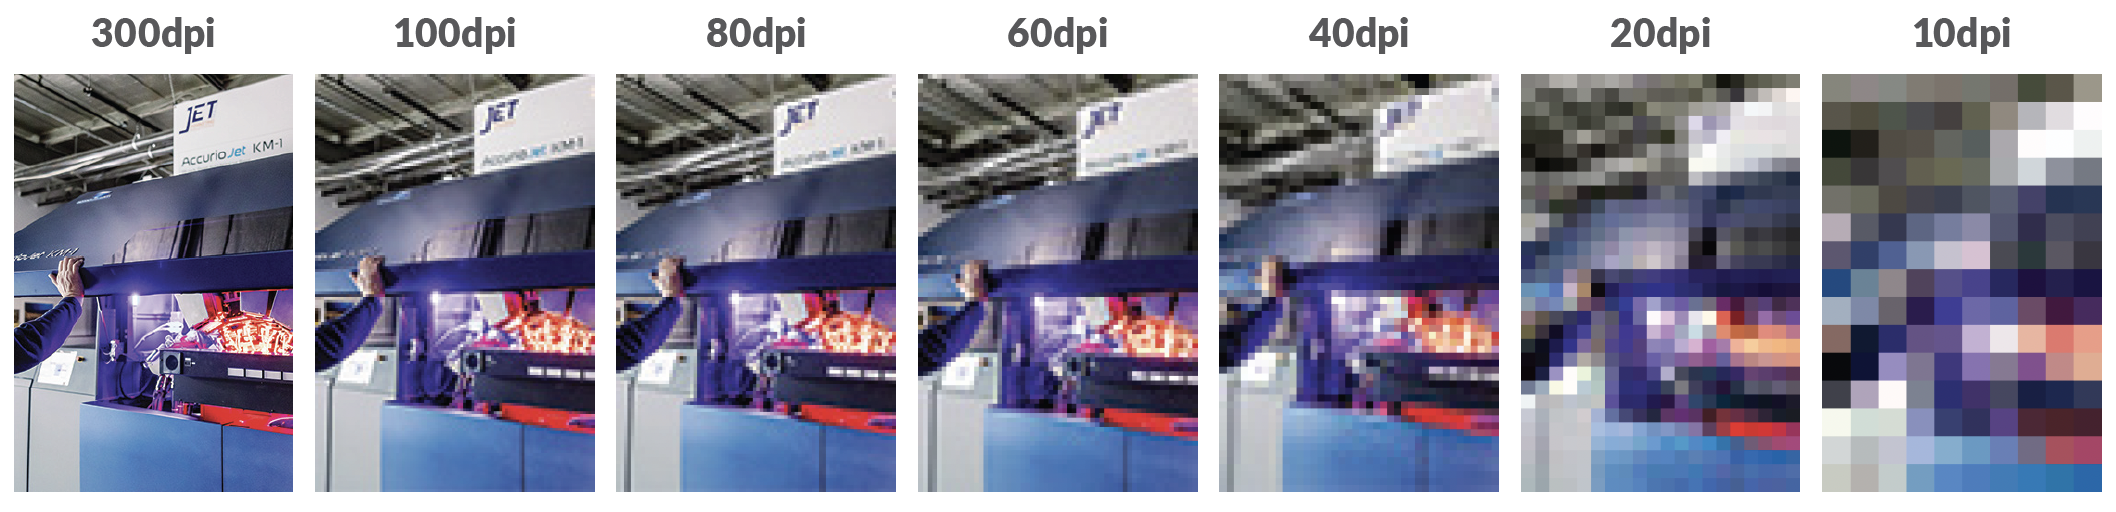
Resolution refers to the number of pixels per inch (ppi) in an image.
Printers use different resolutions than computer screens, and the resolution of the print-ready file must be high enough to produce a sharp and clear printed image. This means that images and graphics must be high-quality and have a high enough resolution to ensure they look good when printed.
Your file should use the highest resolution possible. This will ensure a high-quality print job. Try to use native files whenever possible to prevent loss of resolution. The general rule of thumb is to use a resolution of 300 DPI or higher with print-ready files.
The higher the resolution, the better the quality of the printed image.
Graphics: Raster Images vs. Vector Graphics
Raster images are just that, images. Raster images cannot be resized, manipulated or stretched without losing quality. Photos are a frequently used example of raster artwork. They are pixel-based, and therefore, they are resolution-dependent. The number of pixels that make up an image as well as how many of those pixels are displayed per inch (ppi) will determine the overall quality of an image. For example, if you take an image that is 4 inches x 4 inches and has a resolution of 72 ppi and enlarge it to 8 inches x 8 inches, you will have essentially cut its resolution in half (36 ppi), causing extreme ‘pixelation’.
When preparing raster files for submission, make sure to:
- Design the document to the expected print size with 300 dpi (no less than 150 dpi for decent print quality).
- Avoid up-scaling images as much as possible. Any enlargement beyond the designed document size will cause pixelation.
- Send the file in .PSD, .JPEG, .PNG, .TIFF, .BMP format.
For large-scale prints that use raster images, such as billboards and trade-show banners, most printers will request that you use a resolution of at least 144 ppi or higher since they will typically be viewed from a distance.
If you want to design something that is not dependent on resolution, you would use vector graphics.
Vector graphics can be resized, manipulated and stretched without losing quality. Logos are a frequently used example of vector art. A vector-based logo will provide crisp, clean lines and will retain its visual appeal whether it's on a business card or a jumbo jet. When going to print something vector-based, you could have created it at ¼ scale of what the final output size would be and just let your printer know that, and they can easily upscale it to the size they need without any issues.
When preparing vector files for submission, make sure to:
- Provide vector art when available.
- Package vector art files to include fonts, images, graphics, etc.
- Create outlines of fonts if the packaging is causing problems.
- Submit the file in .AI, .EPS, .PDF format. graphics over raster images is when creating a logo.
If some, or all of these steps sound confusing, a professional printer can walk you through what you need to ensure high-quality prints.
Partner with Jet Mail for All of Your Commercial Printing Needs
Since 1993, the marketing fulfillment experts at Jet Mail have helped businesses across all
industries deliver attention-grabbing print marketing campaigns.
But we’re more than just a printer.
Our extensive menu of print and direct mail services is amplified by our equally comprehensive list of lightning-fast fulfillment services including inventory management, pick and pack, kitting, assembly, warehousing and shipping.
At Jet Mail, we understand the demands of fast-paced and competitive industries, which is why we continuously invest in state-of-the-art digital printing technology and specialize in fast, personalized and data-driven marketing fulfillment solutions.
Businesses rely on Jet Mail to manage more than just their print, mail and fulfillment needs. As a HIPAA-compliant and SOC 2-certified business, you can rest assured that your data is safe, secure and managed with the utmost care.
Contact us today to learn how we can support the continued growth of your business.
COMMENTS